|
|
|
|
Ken Cottingham - Lotus Europa TC |
|
|
Christmas over and time to get back on with the rebuild. It’s a bit colder now and I wish I had a heated workshop, but I haven’t so get on with it and stop moaning. The
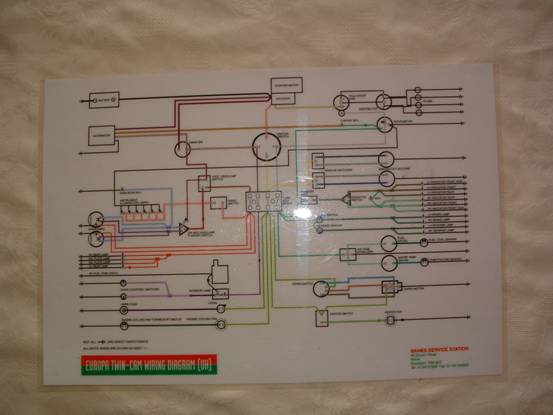
installation of the wiring loom was the next job on the agenda.
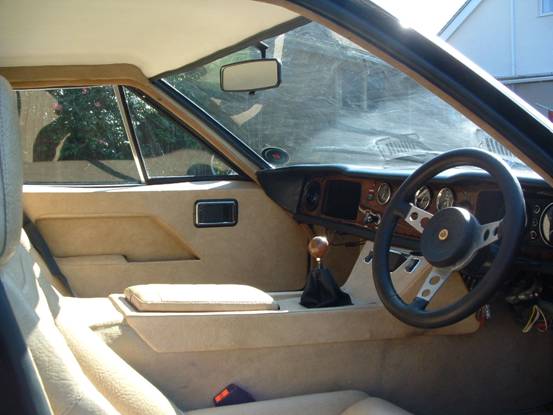
It took us all of January to fit the wiring loom and associated bits and pieces, but that is not as bad as it sounds because as much time was spent drinking coffee and warming up as was spent actually doing any work. It probably did not take any more than 30 man hours in reality from start to finish which I do not think is too bad considering my lack of knowledge and lack of any specific tools/meters. The whole job was done with the aid of a 12v bulb holder, 12v bulb and 2 bits of wire attached to the terminals. To find an ‘earth’ you simply connect one wire from the bulb holder to a known ‘live’ and the other to what you are looking for, when the bulb lights up you have an ‘earth’. The weather turned even colder for February and March and we did not work on the car at all, as the next job was to fit the carpets and a temperature of above 5 degrees was needed. I think if I were to plan another rebuild I would start at Easter and set a finish date for Christmas, that way the best of the weather could be had for the complete job and no break would be necessary. Using contact adhesive the underlay/sound insulation needs to be fitted first, followed up by the carpets. I purchased a new carpet set, from Richard, but there is still quite a bit of trimming required to fit the set. It is not as easy as I thought it would be and uses more contact adhesive than I originally thought. I used 7.5 litres to fit the underlay, carpet set and roof lining. The
next job was to fit the seat belts, which was quite straight The lesson learnt here is do not position the bobbins until the body has settled on the chassis and do it just prior to fitting the seat belts. I believe it is important to allow the body to settle otherwise the body will be exerting undue pressure on the seatbelt fixings and will ultimately break them out. Last but not least the seats were fitted and the cabin work was complete. The final works to be undertaken revolved around making the vehicle roadworthy. I had agreed with Richard to trailer it up to his workshop, for him to give my work the once over, for the geometry to be set up and road tests undertaken. This took just over a day and I drove it back home. Richard found a couple of things he was not happy with, the gear linkage and handbrake. The gear linkage was not really a fault with my workmanship, but more a design flaw. You will see most road test reports state that the gears are difficult to get. However, Richard does a rose jointed conversion kit for the rear end which makes getting the gears allot easier. He fitted this and I must agree that it is now no more difficult to change gear in the Europa than it was with the Elise.
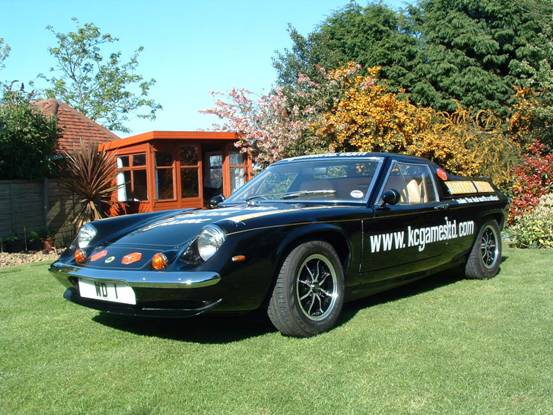
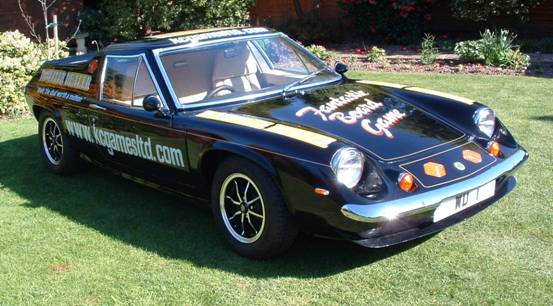
I have now covered just over 350 miles with the car since the rebuild and there are a couple of things I am not altogether happy with. The brakes are not as good as I would like and I may fit a disc conversion kit to the rear end. I have a vibration between 41 and 55 mph, possibly the gearbox (which I didn’t overhaul) or the infamous rear bearings. On the left is a picture of the completed car. Summary I started out to rebuild the Europa with no specific knowledge, tools or workshop. I can confirm that it is possible to achieve it, however, it is frustrating at times, costs considerable sums and takes a fair amount of effort to complete the task. It has taken approximately 700 man hours to do. However, I have had to learn by my mistakes and do some things several times before getting it right. Richard gave me a ‘ball park’ figure for the works I have carried out (£14,000) therefore I have been saving about £20/hour. It has cost just over £10,000 on parts, which is more than I hoped or budgeted for, but on the positive side, the car looks better than I thought it would and should last for quite some time. I would not have been able to complete it without Richards help and most times I phoned to order something I had a question of ‘how do you do this?’. I have phoned Richard about 40 times throughout the rebuild and I thank him for his patience. If you are considering undertaking a rebuild yourself and like me have no prior experience I hope you find this report interesting and informative. If you want one piece of advise, do not try to rebuild the rear hubs yourself, send them away to Richard or somebody else who knows what they are doing and save your self all the trouble, it will also shield your nearest and dearest from a barrage of foul language. Below you will see another view of the completed car (04/05/06).
|
|